The Edit Initial Value,
Edit Initial Values, or
Edit Argument button (

) is available under the tables in declarations and command sequences. You find the
Edit Initial Value or
Edit Initial Values button under the tables in scalar, array 1D, and array 2D declaration nodes. The same button, but as
Edit Argument, is available in the
Settings window for the following nodes that support a command sequence:
Button,
Event, and
Item nodes. It is enabled for commands that use arguments. The
Edit Argument is also available for defining inputs to methods.
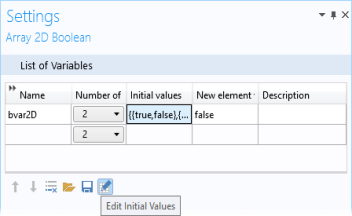
When you click the Edit Initial Values button, you can edit the selected row of the
Initial values column in the window that opens. For example, the following image shows how you can edit the rows and columns of the boolean 2D array.
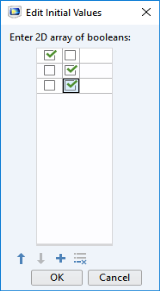
When you are done and click OK, the initial values are pasted into the
Initial values column with proper array syntax. For example, the edits above produce the following array:
You can also use the Load (

) and
Save (

) buttons to load the initial values from a text file or save them to a text file.
For command sequences, the toolbar button works in a similar manner. The difference is that this table supports more types of data to enter in the Arguments column. The
Set Value command on data sources shows identical windows as the nodes under
Declarations. Other commands, like plotting a plot group or evaluating data into a result table, use their own
Edit Argument windows.

For some command sequence commands, you can use declarations in the arguments. Such declarations are possible to use for commands to plot graphics, view built-in commands, run numerical features, set declarations, and run methods. For the commands to plot graphics, view built-in commands, and run numerical features, you can use this functionality in the Edit Arguments dialog box. You can also enter the arguments manually. To access a scalar, an array as an array, or a matrix as a matrix (as opposed to accessing individual array or matrix elements), use the name of the declaration itself (
output, for example). Using an array as a scalar or a matrix as an array is done by adding an index (
output(1), for example). A matrix element can be retrieved as a scalar by adding two indices (
output(1,3), for example). You can use other variable declarations when specifying the indices (
output(n), for example, where
n is a scalar integer declaration).
For the Plot graphics command and the View built-in commands, you can only use string-type declarations (with appropriate indices if necessary) containing a path to a graphics object. For the other cases, all types of declarations, with or without indices, can be used as long as there is a reasonable interpretation of the source declaration dimension in the target declaration (or method argument) dimension. If, in a plot command, there is a graphics object named graphics1 and a string declaration named
graphics1, for example, the content of the declaration will be used, unless single quotes like
'graphics1'are used, in which case the graphics object is used. You can add a declaration (integer, double, or string) as an argument to the run numerical feature command. In that case, the table data, stripped of the initial parameter columns, which is produced by evaluating the numerical feature, will be put in that declaration when the command is run. The command checks that the dimensions agree. When converting a command sequence into a method, those checks are generated into code.